Followers

Monday, 30 April 2012

Woodware Challenge - Buttons and Bows

Get your Christmas hats on girls - this is the first Christmas card I've made this year!

I've used the Woodware button punch CP42-05 and the red and white cord.
I've punched several buttons, edged them with a coloured ink pad and tied the cord into a bow on the big buttons but knots on to the smaller ones.
Each button is stuck flat onto the die cut shape except the button with the tag
which has foam pads under it.

The little tag is stamped with JGCL551 Christmas verse and JGS155 snowflake medley onto translucent shrink plastic.

The card is made from an A4 piece of cream card, scored and folded then covered with patterned paper.


Tuesday, 24 April 2012

Blog Hop - Woodware and ClearSnap a tulip!


We're having a blog hop!!!
Welcome to theWoodware and ClearsnapSpring Gifts Blog Hop!!!Whether you're getting ready for Mother's Day (US), graduation season, or just because, these gifts ideas can be made with a few Clearsnap inks, Rollagraph Stamp Wheels, and Woodware Craft Collection Clear Stamps. All week long we'll be sharing inspiring gift ideas on our blogs..

Having just returned from Holland, we had a very relaxing river cruise and saw fields full of tulips. I thought it a good idea to make a card with my large tulip stamp JGS162. This card reminds me of a William Morris wallpaper!

I have used some Clearsnap Rollagraphs and coloured pigment ink onto white card. For the tulip I used reel no 26120 column relief and for the background reel no 26048 leaf nouveau.

First roll out the design onto an ink pad, then apply the design to white card. Stamp the tulip several times in black ink over the top of the deign and cut out. Cut away some sections of the tulip to create a 3D effect.

To make the background and base card, I made a 105mm x 297mm base card and run the reel over green ink then applied the design directly to the base card. It's so easy and quick. I've distressed the base card a little with a contrasting ink.

Cut a stem for the tulip and stick to the card, stamp a greeting and then stick flat one complete tulip shape on top of the stem. Then mould the other pieces slightly to make them curved and stick one on top of the other using silicone glue. Use the single front petal as the last layer. Allow to dry and there you have it, fantastic!

Using these Rollagraphs is a great way of making your own background papers. There are lots of designs to choose from - so get some and get rolling girls!


Head on over to the Clear Snap Blog to see what they've created today!! And don't forget to follow Clearsnap  on Twitter and Facebook and you will find Woodware on Twitter and Facebook too.

Sunday, 22 April 2012

A day at The Stoke Gallery

I just have to share this photo of a very stylish card made by Ruth who works and teaches at The Stoke Gallery in Gosport, Hampshire. I went to take a floral punch craft class there yesterday and saw this card that Ruth had made for a class a few days ago.
She has used my single clear stamp from Woodware JGS157, Dog Rose Wreath and I think it's so pretty and delicate. Ruth stamped the image on green paper and cut it all out. Sooooo patient! She has stuck this to an embossed card on a base card.
Ruth then stamped twice onto a pale, pale pink paper and cut the flowers out.
She has stuck one layer of flowers on top of the green and then the other flowers have been coloured slightly with a little pink ink using a stencil brush. Each flower has been shaped and stuck only in the middle to create a 3D look. The little buds have been coloured in with a white gel pen. 
Seed beads have been used in the middle.
Thanks Ruth for this inspiration.


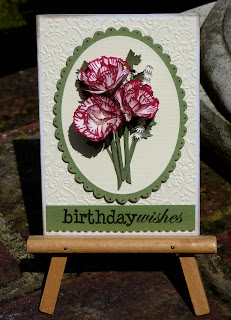
So, back to my class at The Stoke Gallery yesterday.....we made carnations using the floral punch craft technique, punches and paper.
The card is A6 with an embossed background, all made from cream card. A die cut green scallop oval and a plain cream oval frame the three carnations and I have made some sprigs of ivy and little sprays of tiny cream flowers to complete my little bouquet.
All instructions for the carnation can be found in book 2 (red cover) of Leone Ems floral punch craft book available from Woodware stockists. All punches are from Woodware and I teach several times a year at The Stoke Gallery, my next class there is the 23rd June and we will be making cyclamen.


Blog Hop.....

Woodware and Clearsnap are showcasing Jumbo Rollagraphs for you all week from Monday to Saturday so keep an eye on us!.


Wednesday, 18 April 2012

Woodware Challenge Turquoise and Brown

Thank you Dorothy for choosing this wonderful colour combination of turquoise and brown.

My card today is only stamped, nothing is coloured in except for a little distress ink around the edges. I'm making good use of the white embossing powder on brown, a great combination.

Using Woodware's JGCL553 daisy dots stamp, I've stamped a milk chocolate coloured piece of card all over with VersaMark ink and sprinkled over white embossing powder, heat it till the embossing powder has all melted to create this pretty background.

I've used a doily to frame my focal point which has a die cut scallop circle and a plain circle in the middle which I have embossed again. The turquoise panel in the middle of the card has been stamped with one of the other smaller stamps on the set using Versafine vintage sepia.

The three flowers which I have stamped, embossed and cut out also come on the set. I love the big button tied with twine which matches the same colour brown as in the background card.

The ribbon is from one of the new Woodware boxed sets of ribbons, number 51408, its full of plain yellow, turquoise and some spotty and striped ribbon. To finish off, add some turquoise glitter glue to highlight the design on the circle.

Thursday, 12 April 2012

Woodware Challenge - 21st Birthday

This card is made from an A4 piece of white card scored and folded in half to make the base. The background paper is from the Woodware 12x12 pack called General Selection. It's a nice fuchsia pink with tiny hearts all over it.

I've cut a panel of pink card and have used the Japanese fan (CP43-20) cassette and the Crafty Edger to punch the border which is then coloured with a pink ink pad. This is layered onto silver card before wrapping some pink spotty organza ribbon around it.

Once mounted on the card I have used the '2' and '1' shapes from the Woodware number chippes (JL722) as a guide and have drawn the two numbers lightly in pencil. I placed the silver Card Candi (Twinkle CC090) from Craftwork Cards (Woodware stock these too!) along the pencil line to plan where I was going to stick them, then carefully picked each Cardcandi up and stuck it down with a foam square. They feel like little cushions!

The large flower is another Woodware chippie shape (Flowers and Hearts JL713) which I have coloured with a pink ink pad and over stamped it with a Magenta stamp. Punch a one inch circle from pink card, edge with pink ink and stamp. Stick it to the flower centre and then add another silver Cardcandi. The flower is then adhered to the card with foam pads.

Friday, 6 April 2012

Woodware sketch challenge - April

For this weeks sketch challenge I've used my bubble bird set of stamps, JGCL552. I've stamped the image on to blue card and cut the bird out then decorated it by filling in all the little circles with gems or glitter. I've drawn a branch shape and cut that from brown card.
The ribbon across the card is from the new boxed sets of ribbon Woodware are stocking now, the code for this design is 51404. I just love the colour ranges this new ribbon comes in.
The ribbon is set against a strip of blue card to give it a bit more width which gives the card a good balance. The wording is from my Huge Birthday Card JGS266 single stamp.

Tabitha looking cute

Tabitha looking cute
Look, I’ve just caught you another mouse!