Followers

Wednesday 15 December 2010

Rocket Christmas

Just had to get one more in before bed. I'm off in a minute to make a mug of Ovaltine, snuggle into my bed with my book 'The Girl with a Dragon Tattoo', it's brilliant.

Anyway.... here is my rocket tree card. The Rocket Christmas set of clear stamps. Take a selection of textured card and stamp the different shapes on the stamp set on the reverse of the card. Cut out with scissors - no need to keep it neat. I cut mine out slightly larger than the stamped image. Now turn the pieces over, edge them with contrasting coloured ink pads and arrange them on a prepared base card.

Once you are happy with your design start sticking them down. I have stuck two or three down with 3D foam pads to give it some depth.
Add some gems, stamp and cut out the base as before and stick in position. Make a shrink plastic tag and stamp the greeting, shrink and attach to one of the raised sections with some pretty ribbon.

It's easy to do and you can make your tree really tall and slender or cute and fat by adding or taking away some of the shapes. Just another way of using the stamp set (this is my favourite!). I love these colours too, I even wear them!

Bubbles for Christmas

Yes, it's me back again, twice in a week I hear you are cry!!!!

Thought you might like to see my bubble wreath peel off in action. It's a tall card, A4 card folded in half long ways, cut some Bazzill Bling to fit and attach a ribbon to the top leaving it long enough to reach the base of the card. Stick the Bazzill to the base card. Attach your bubble wreath peel off or stamp it, yes folks you now have a choice! On my sample I have used a gold peel off. Decorate with what ever you have in your craft stash, buttons, beads, gems, sequins, brads, peel off gems...I could go on. What's most important is a colour scheme... here I've chosen gold, pretty classic and always pleasing. But the design works with all sorts and even mixed up colours for a dramatic, contemporary look - try orange, purple and lime green yummmmmm!
I drew the ribbon using a stickles glitter glue bottle. Yes, it is easy, have a practise and then draw your bow in pencil. Once you start using the glitter glue from the bottle, be brave and keep it moving till you have completed tour ribbon.
I chose a nice peel off (I never use peel offs I once said in a class!!!) for my greeting to make it quick and stylish. All that you have to do now is leave it to dry.
I love making these........now you try....go on..... sparkle!

Sunday 12 December 2010

Crafty Christmas Cheer!

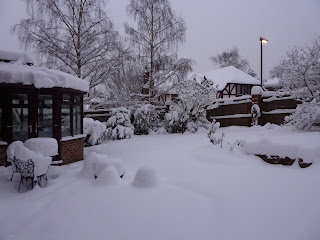
Here is a nice wintery scene of my back garden on the 2nd December. We had 16 inches of snow over two days. No cars, trains or planes! It was so peaceful and beautiful.


Here we are, very pleased with our Christmas wreaths from back left June, Carol, Georgina, Fizz, Gloria, Clarissa, Gill, Janet, Sandy and in the front Trisha, Claire, Sarah and me.


My last class of the year was yesterday at The Glitter Pot and we all had a fabulous lunch too! Thanks to everybody who came Fizz, Sarah, Clarissa, Trisha, June, Janet, Gill, Sandy, Claire, Georgina, Gloria and Carol who all bought some scrummy food to share. We really did have a feast! The lunch is now a regular Christmas event at The Glitter Pot so put it in your diaries ready for 2011 girls!
As you can see, we are pictured in the shop holding one of the items we made, Christmas wreaths from circles of card with stamped and cut out images to decorate them. Everybody made a fabulous work of art which I hope will always come out of the decoration box each Christmas.
I rushed home to watch Strictly Come Dancing, had a glass of wine with dinner and was ready for bed by 9.30....you girls certainly know how to tire someone out!!
Wishing you all a very happy Christmas and a crafty new year.

Tabitha looking cute

Tabitha looking cute
Look, I’ve just caught you another mouse!