Followers

Friday, 31 May 2013

Woodware Challenge - Background Effects

Its fun, fast and it could get addictive!
The Magic Foam blocks are essential to every girls craft box.
The blocks are mouldable when heated with a heat tool. Just press the heated surface onto any object for about 20 seconds and hey presto, you have your very
own personalised stamp!
You can use a number of everyday objects to create your backgrounds....buttons, beads, leaves, soles of shoes, rubber bands, bubble wrap...the list goes on.
If you don't like what you've created, then just heat and do it again.
If you like what you've created, keep it forever.
But believe me....you will need more than one block, I cut mine up to make circles, small squares and other fancy shapes, great for making a border.
Ink up your moulded block with pigment of die ink pads and get stamping.
Try inking with dye inks and spritz with water before you stamp for a water colour effect.

For my sample I used some old lace and two shades of pink ink pads.


A close up of the lace detail
The Magic Foam block showing the impression of the lace I used

Saturday, 25 May 2013

Woodware Challenge - Colours of the Earth

For my offering this week I have made a tri fold card.
I have die cut six shapes using a die from Sizzix.
I stamped the background of three of the shapes using the ColorBox stylus
tool and a square black tip.
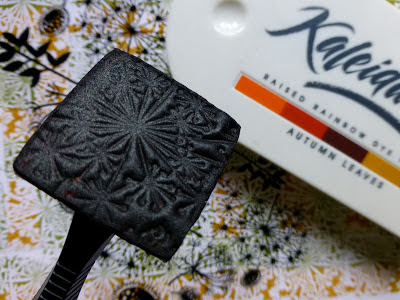
The black tips are mouldable, simply heat for a few seconds and press into a textured surface to create your own personal stamp. Re heat the tips and use them again and again.
They come in assortment of shapes too.
Once you have your moulded tip, I used a section of JGS301 grasses background,
ink it up and stamp!
Once you have stamped all over the surface of all three shapes, stamp with JGS300 going to seed using VersaMark ink pad, embossed with any coloured embossing powder you like. I have stamped the image three times.
The greeting comes from JGCL569 inspirational verse and that too is embossed.
Once stamped, edge the shapes with a gold Krylon pen and attach card 'hinges' to the backs before sticking the other three blank shapes to the back of the stamped ones.
The swirls are from Magenta chipboard packs which I have inked with VersaMark and then dipped into green embossing powder, heat to melt and stick to the finished card.

A close up showing the embossed Magenta swirl chipboard
The ColorBox stylus tip showing the embossed image
from JGS301 grasses background
All the things you need to create the wonderful background.
I even made some background paper too!

Tuesday, 14 May 2013

I've walked my walk!

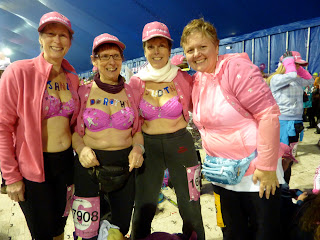
Thought you would like to see some pictures of the Moon Walk in London on the night of the 11th May. Judith, Dorothy, Françoise and I walked 26.2 miles, it was cold, windy and very long but at least it was dry and the morning was bright and sunny.
My poor legs! But we did it and very proud we are too.
Judith and Dorothy hard at work decorating their bras. 
The finished bras, just fabulous!
Me, Dorothy, Judith and Françoise ready for the off.
Inside the big pink tent. It was quite cold.
The morning after...just so tired and having a much needed cuppa.
A view of the tent next to Battersea power station.

Monday, 13 May 2013

Woodware Challenge - Cards for Men

Here is a nice theme for men's cards, nice old sailing boats.
This is a 'Frigate' from Woodware stamp set JGCL554.
All the images on the card are on the set and I love the background which is stamped using three of the individual stamps from the set. Just lay the stamps onto a block close together and stamp all over the base card, here I have used craft card and stamped with black ink.
You can always add a message from another stamp if you wish.


Tuesday, 7 May 2013

Woodware Sketch Challenge

We all like layering on our cards and this Woodware sketch challenge this week has three!
I've used a combination of turquoises and greens and added silver which goes very well with that colour combination.
The stamp I have used is JGS302 Viva la Plume. A great background stamp for any occasion. I have stamped only part of the image and embossed it with white. Go over the top with contrasting ink pads to match your card and
wipe away the ink from the embossed image.
The border peel offs are by Magenta, the wide one is 90978 and the narrow one is 94110. The wording is from sheet 94460.
Decorate with some Woodware paper flowers and add a gem or brad to the middle.


Here is a close up of the wonderful embossed text background.


Wednesday, 1 May 2013

Woodware Challenge - Graduation card

Today's post presented me with a challenge! On the blog list Dorothy from Woodware sent me, it said 'Graduation Car'. I've taken this as a little typing error,
I hope she meant 'Graduation Card'.
Well....this is my idea, a card not a car!
I've used some Stampendous alphabet stamp to create the word 'Graduation'.
There codes are.....
SSC055 Retro
SSC007 Storybook
SSC126 Doodle
Each one is stamped on a piece of card and then trimmed, edged with some red ink and stuck to the base card, some are flat and three are raised using foam pads. The 'degree' is just a piece of rolled up paper tied with a red ribbon and a gem above the i.


Tabitha looking cute

Tabitha looking cute
Look, I’ve just caught you another mouse!